Here's the deal. Apparently there is a storage limit on the pictures
you can upload to a blog. Considering a normal post for me contains
about 15 pictures (sometimes up to 40!) this has become an issue and I'm
right now forbidden to upload any more pictures unless I 1. buy more
storage (ha yeah right) or 2. decrease the size of my photos.
Apparently there is a pixel count that you have to be under to make it
"free." I now just have to figure out that pixel count and only upload
pics like that from now on. You can also upload your pics into google+
and then upload them to your blog since google+ automatically changes
the format into the correct number of pixels (shameless push for google+
if you ask me). One fo the problems is that a lot of the pictures I've
uploaded I've since deleted (I mean who needs to save numerous pictures
of me adding flour to a mixing bowl!). So now I'm faced with taking
all the photos in all my posts, saving them to my computer, changing the
pixel count, and re-uploading them. In summary, this is going to take
some work. And time. And PATIENCE. OMG you have no idea the amount of
patience this will take because none of you are working on my
computer. This thing is slooooooooow, like epically slow. Remember the
days of the computer modems that went erww erwww eeeeeerw and took a
minute or two to switch to a new internet page? Well my computer is
slower. Poor thing, it's lasted years and years and has traveled as
many miles cross country as I have. It's suffered being stuffed in
suitcases and having tons of student edition software downloaded then
deleted on it. It's gotten me through scholarship letters and typing
and formatting my Master's Report. And it's slowly been showing it's
age. I stopped traveling with it unless absolutely necessary. I even
stopped moving it unless absolutely necessary! The switch that connects
to wireless networks is very temperamental (apparently all VIAOs have
this problem according to the tech guys) and will switch on and off if
so much as breathe on the thing. It also takes eons to start up and
then decades to open the internet and years to allow you to click on
something. So now it sits on a drawing board on the side table next to
the couch and there it stays. My father has refused to even consider
working on it (probably good for his stress level) and I sometimes
threaten my sister when she asks for an ipad to do her hw that she is
free to use mine! Her face is priceless.
I fully intended to buy a new computer after graduating and saving up
some money but then Windows 8 had to start rearing it's head and all the
tech blogs were saying don't buy a new computer, wait till Windows 8
comes out and all the other computers will go on sale. Buy one then.
Well I waited, and I waited, and my computer was getting slower, and
slower. Finally Windows 8 debuted and I realized that I should have
factored in quite a few more months before being able to buy a new
computer. There weren't enough new computers on the market that ran
Windows 8 to make the price of the other computers go down. I'd saved
up enough money that I could invest in a computer that ran Windows 8,
which I decided I wanted to do anyway (why buy a brand new computer that
will be outdated in two years because it doesn't have the correct
operating system?!), but Consumer Reports wasn't going to finish testing
the new crop of Windows 8 compatible computers and publishing their
findings until January and it's becoming very clear that I'm not sure my
computer will be functional come January. So I made a new plan and
implemented it over the Thanksgiving break.
I'd been seeing a lot of lightning deals on Amazon the week of
Thanksgiving and decided that I would purchase either a great deal from
them or get a computer on sale at Best Buy, keep it for a year or two,
then purchase a new Windows 8 computer and sell my year-old computer to
my parents (at a discount of course).
And success! I found a good deal on Thanksgiving Day (which means I
wasn't tempted to shop at all on Black Friday ;) ) and am now anxiously
waiting for it to ship! Until then I will try, try again to upload the
pictures for a pumpkin pie post. Google+ crashed on me last night so
maybe it will work today if I stand on my head and hold my breath. Wish
me luck!
Wednesday, November 28, 2012
Saturday, November 24, 2012
Magical Poufs
1. I had to figure out how to make them usable as seats. I'm envisioning people sitting around the coffee table watching football or playing a board game (haha yeah right maybe once a year) or have them as extra seats for the parties I will throw when I have my own place ;) (Congress needs to get off their duff and stop sequestration from happening so I can be financially secure with a good paying job and go buy myself a condo!) But having them as seats meant that they had to be sturdy enough that people, not children, actual full sized people, could sit on them and they would still be at the same level that the people on the couches were. And the pouf needed to spring back into place when no one was sitting on it anymore.
2. I had to figure out how to make it uniformly stuffed, not overstuffed (I was going for a cube shape, not a sphere), and not lumpy. This actually took the most time.
But I did it! After weeks of trial and error and many, MANY trips to JoAnn's I FINALLY was happy with the finished product. It is my magnum opus and I want to share with you how I did it :)
First, I measured out my fabric on the dining room table. For the pillow's I'd previously made I just cut them on the floor but I wanted to be really precise this time.
So I used one of my old engineering scales (it's weird, I'm an engineer but I only ever use an architect's scale. Whatever) and a t-square to measure and a pencil to mark my cuts. This took a looooong time.

I hate prepping I just want to get to the doing!
Alright here are all the pieces I needed. I determined that I wanted the cubes to be 24"x24" square and 18" tall. And I wanted to make two cubes. So I took my fabric (which was the 54" home decorator fabric on the rolls at the fabric store, not the 45" fabric on the bolts) and cut four squares, two rectangles, and four 2" wide strips for the piping. I allowed for at least 1" of extra fabric for the seams.

You have to measure it out depending on how big you want your cubes to be, but I was able to make these with 4 yards of fabric. This is how I figured out my yardage:
Top: 22" + 2" seam allowance = 24"
Bottom: 22" + 2" seam allowance = 24"
Side: 22" x 4 sides = 88" + 2" seam allowance = 90"
Top + Bottom + Side = 138"
1 Yard = 3 feet = 36"
Yardage = 138" / 36" = 3.8yds so round up to 4 yards.
You don't need to add yards for the piping. Since the sides are shorter than the top and bottom are wide (did that make sense?) you have extra room for the piping. 24" wide compared to 20" tall, so 4" left over to cut two strips 2" wide!

It's all a big puzzle. When in doubt get more yardage. This way you won't feel so much pressure to not make a mistake. And any leftover fabric you have can be turned into pillows!
Whew, it's finally time to start making these things!
First I start with the piping. I decided to make my own but you can buy yours or make them without any piping at all. Just personal preference. If you're making your own, put the piping cord in the middle of the 2" fabric strip, fold the fabric in half and pin it closed right underneath the cord making sure it's tight enough to not slip.

Piping is all pinned.

Then just sew the piping together using a zipper foot so you can get as close to the piping cord as possible.
Then pin and sew the piping to the two tops and two bottoms.

Now here's the tricky part because you're working with a bunch of fabric. Take the piece of fabric you cut for the sides and start pinning it around the outside of the bottom squares.

You'll end up with something looking like this.

You'll want to sew together the side piece that's open, so fold the fabric all pretty and pin the side closed.

When all the fabric is controlled and neat (it takes a bit of wrestling to get it all straight) press down where the piping is and pin along that line. Since you know the piping is sewn on straight this will allow you to get your seam for the side straight.

Once the side is sewn together, cut a 1" notch at each corner.

See the notch allows the fabric seam allowance to fold over and attach to the top.

This is how I wrestled the shell open so I could attach the top piece.

Now just match the notched corner to the corner of the top piece.

Put the pieces together, pin, and sew! Only sew two sides of the top piece though. You'll want to keep two sides open so you're able to stuff it.

Here is the answer to my soft yet shape-retaining dilemma! It's a 2" thick piece of high density foam. I got mine at JoAnn Fabric and I got it when it was on a 50% sale (which was good because I needed 8 of them!).

I also used this to wrap the sides and make them look soft. It's quilting batting and I got the thickest stuff they had. Thicker = softer in my book. It comes in thin layers so I doubled it up. I cut two 22"x22" squares, and four 22"x18" squares. Essentially the batting wraps the foam squares and is the layer between the foam and the fabric so you don't see corners and layers and stuff. It makes it all smooth.

I also used an old foam mattress topper from my dorm room in college. We were using it to try and pad the extremely uncomfortable pull out couch bed when company came over, but I'll replace it. You can just use all foam squares but I was saving some money (and I ran out of foam squares and didn't want to make another trip to the fabric store and I wanted to finish the poufs that night gosh dang it!).

I just cut the mattress topper into 22"x22" squares to match the foam. Btw, did you notice how the squares are 22"x22" and I made my poufs 22"x22"?! It was a bit of a "oh hey that worked out well, whew!" for me but fyi for you, they sell foam in 22"x22" squares so I would suggest that for the size of your poufs.

Alright, here are all the materials I need to stuff my pouf! Batting, mattress topper squares, and 2" foam squares.

Here's how I stacked the foam. I put the 2" foam squares on the top and the bottom so it would feel the nicest when you sat on the poufs.

Now I just had to stuff the pouf. Start by placing your fabric on the floor with the opening on the top. Put the 22"x22" batting layer down first.

Then fill with the foam layer by layer.

Once you get about 2/3rds of the way filled, stuff the batting around the outside. One 22"x18" piece for each side. And when I say stuff I mean STUFF. You've got to wrangle that batting in there. make sure it get's into the corners and doesn't overlap. It's not hard, just takes some time.

Continue putting in the rest of the foam layers. Before you add the last layer of batting on top, cut any of the batting that is sticking over the top edge.

Then pull the top panel over the batting, pin, and hand sew the final two edges and boom, you have a pouf!

My gorgeous poufs!

Here I am sitting on one of the poufs. I'm not tiny and these things didn't compress all that much. I was still on the level of people sitting on the couch. Yay! The foam idea worked!

Here I am using the pouf as a foot rest. It's exactly the right height to prop my feet on. Wonder how that happened ;)

There you have it! My awesome, spectacular, amazing, do-it-yourself poufs! That cost about $100 to do BOTH instead of $325 for ONE! Go out and make some yourself :)
Monday, November 12, 2012
Halloween Festivities
Well I've mentioned how Sandy kinda put a wrench in our Halloween preparedness, but we soldiered on. I mean we had to have Halloween. We had to carve pumpkins, we had to hand out candy, we just had to! It's funny how you cling to normal and routine and traditions after things go wrong or change drastically. It's like when I moved out to KS my first year of college. I was halfway across the country away from the family I'd lived with my whole life. The only places I felt calm and not stressed for the first few weeks were Target and church. There was comfort in the familiar and the routine. So anyway we had to carve pumpkins. I knew I couldn't do it all by myself when I got home though. People trick-or-treat early nowadays and I get home around 5pm and I had to have the pumpkins out when it got dark around 6pm and one hour is not enough time to hollow out three pumpkins and carve them. So we hollowed out the pumpkins the night before and carved one so I only had to carve two when I got home (which gave me a bit of a reprieve since I still hadn't thought up my design yet. Have I ever mentioned that I procrastinate? No? Well I do.)
So this was Tuesday night before we all faced the reality of going back to work the next day. We set up the pumpkins on the table after having spread newspaper down. I had one bowl for guts and one for seeds. And lots of random spoons because I can never remember which one worked the best from the year before.

Then we cut the stems out. We always cut them in diagonals. I've seen people just cut around the stem in a circle. This is weird to me. I'm sure it works fine but ever since I was too young to carve my pumpkin by myself we've always done diagonals so that is what I will do forever more.

Then we pulled the tops off to get to innards. Gooey, squishing innards.

It's a messy job but someone's got to do it! And it is messy. You get messy all the way up to your elbows. You know, it's a good thing I 1. never became a veterinarian and 2. never grew up on a ranch. Just saying my definition of "messy" might be a bit different considering where veterinarians and ranchers have to stick their hands . . .

Look, Innards! Guts! Glory! Me looking absolutely stunning with no make up . . . HA! Not.

Haha I find this picture amusing. It reminds me of those cartoons of miners with their gold tooth glinting in the sun. Then someone would see the glint, realize the miner's tooth was gold, and subsequently punch him to make the tooth pop out. After which the puncher would walk away one gold tooth richer.

Ah no gold tooth shine, that's better.
The pumpkin on the left is Medium Well's and the one on the right is mine.
(Yes I'm starting the whole "don't use actual names on the internet" thing.)
Medium Well was struggling with food poisoning at this point so she couldn't send a pumpkin idea, but Dad made one with a cowboy hat because it's what she would have wanted ;)

This is Small Fry's pumpkin. Her's was carved later because she was being a booty-head (worse than normal) and didn't give me her design until I had already carved mine and put it outside with Medium Well's. So I only have a picture of her's by itself. Anyway, that's a mustache in case you couldn't tell.

Ah I love this picture! I didn't mean to take it but I snapped it right before Dad shut the lights off. Anyway, it looks so homey!

Here's the pic with the lights off. I don't know why Small Fry's pumpkin has a weird glow around it. I took about ten pictures from all different angles and her's was the only one that had a glowing halo. Oh well, no biggie.

And here is the table right by the door with the candy bowl all ready to give to trick-or-treaters! Of which we had a grand total of . . . . seven. Not kidding. Only seven. I was bummed. What good is having a house if you don't get trick-or-treaters? All the parents nowadays are taking their kids to the mall to go "trick-or-treating" which is a load of bull. Seriously. When I have kids I'm dragging them around the neighborhood. So watch out future neighbors, you'd better have candy ready for when I take my future kids trick-or-treating! Or you'll have to answer to me!

So this was Tuesday night before we all faced the reality of going back to work the next day. We set up the pumpkins on the table after having spread newspaper down. I had one bowl for guts and one for seeds. And lots of random spoons because I can never remember which one worked the best from the year before.

Then we cut the stems out. We always cut them in diagonals. I've seen people just cut around the stem in a circle. This is weird to me. I'm sure it works fine but ever since I was too young to carve my pumpkin by myself we've always done diagonals so that is what I will do forever more.

Then we pulled the tops off to get to innards. Gooey, squishing innards.

It's a messy job but someone's got to do it! And it is messy. You get messy all the way up to your elbows. You know, it's a good thing I 1. never became a veterinarian and 2. never grew up on a ranch. Just saying my definition of "messy" might be a bit different considering where veterinarians and ranchers have to stick their hands . . .


Ah no gold tooth shine, that's better.
The pumpkin on the left is Medium Well's and the one on the right is mine.
(Yes I'm starting the whole "don't use actual names on the internet" thing.)
Medium Well was struggling with food poisoning at this point so she couldn't send a pumpkin idea, but Dad made one with a cowboy hat because it's what she would have wanted ;)


Ah I love this picture! I didn't mean to take it but I snapped it right before Dad shut the lights off. Anyway, it looks so homey!

Here's the pic with the lights off. I don't know why Small Fry's pumpkin has a weird glow around it. I took about ten pictures from all different angles and her's was the only one that had a glowing halo. Oh well, no biggie.

And here is the table right by the door with the candy bowl all ready to give to trick-or-treaters! Of which we had a grand total of . . . . seven. Not kidding. Only seven. I was bummed. What good is having a house if you don't get trick-or-treaters? All the parents nowadays are taking their kids to the mall to go "trick-or-treating" which is a load of bull. Seriously. When I have kids I'm dragging them around the neighborhood. So watch out future neighbors, you'd better have candy ready for when I take my future kids trick-or-treating! Or you'll have to answer to me!

Saturday, November 10, 2012
Past Few Weeks
Let's just say it's been a crazy couple of weeks. Not a bad couple of weeks, but a crazy couple.
First of all, two weeks ago we were all in "prepare for Sandy" mode. All week a weather blog had been analyzing the situation and by Saturday we were all 100% sure that hurricane Sandy was coming, but we didn't know how badly we would get hit. I went out on the previous Thursday and stocked up on water bottles and non-perishable food like apple sauce and peanut butter and soup and lots of things that come in a box that you just need to add water to. (now that the storm is past my mother will happily be donated all the sodium laden instant meals I purchased to some thankful food pantry . . . ).
Sunday came and they were saying the winds would be worse than expected and we would get more rain than forecast. School was canceled and everyone's work was canceled for two days. My work shut down our servers which meant that I couldn't work remotely after noon on Monday. I spent the rest of the day baking everything I could imagine to use up the perishable items in the fridge and to have snacks on hand that didn't have to be refrigerated.
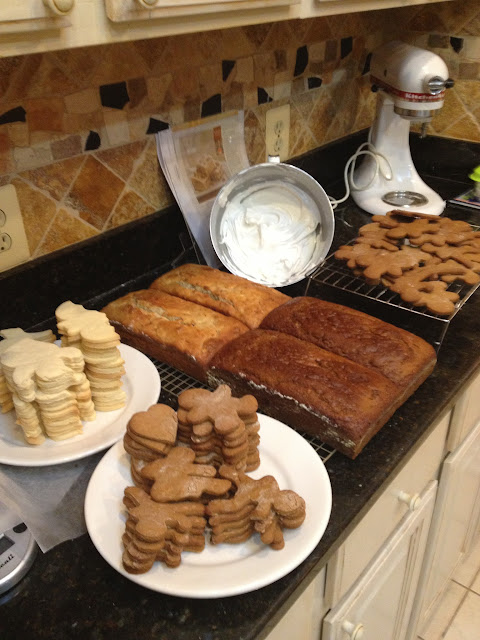
I don't know about you but I would much rather get through a power outage eating pumpkin bread rather than crackers.
The worst part of the storm hit on Monday night. We were on the back edge of the storm since the winds were rotating counter clockwise and we didn't sustain too much damage. On Tuesday we went out and surveyed the damage. There wasn't much. I was a little bummed. I mean obviously I was excited that we hadn't lost power and there weren't millions of trees down and there wasn't flooding, but we were preparing for something BIG! And something big could have happened, it just didn't where we were.
(I actually went into work and told my boss about how there was so much hype and we got barely anything. He looked really surprised and said that where he lived trees and power lines were down and they couldn't even get out of their neighborhood! I felt a little sheepish for complaining about our lack of damage after that . . . )
Here's the extent of the damage I saw around our house.
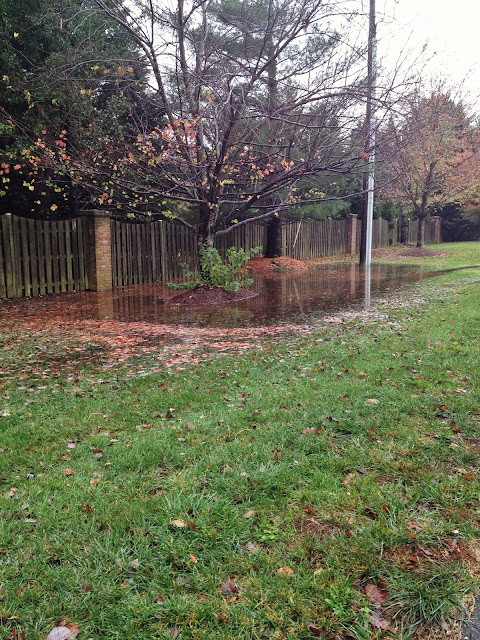
There was flooding in low lying areas. Which makes sense since we did get close to 8" of rain!

Leaves were blocking the water from getting to the storm drains since it is fall and all the leaves were blown off the trees.

This was the biggest damage I saw. It was an evergreen and the needles were thick enough that the wind caught it and blew it over. Too bad it wasn't closer to Christmas . . .

And there was a lot of this. A lot of trees fell over but they didn't fall down, they fell into other trees. Have I mentioned there are a ton of trees where I live?
But yes, so that was Sandy. Everyone went back to work and tried to get back to normal on Wednesday. I now was facing an incredibly busy week. I got Monday and Tuesday off from work but that didn't mean that I still didn't have to make up the hours. And that night was Halloween! And we hadn't even thought about carving pumpkins for the past two days! So when I got home I carved pumpkins.

Thursday I worked longer hours and tried to make up some time but I couldn't make up much because I had to pack since I was leaving the next day for Kansas! Friday I loaded up my car, went to work like normal, left at my normal time, parked my car and took the metro to the airport where I flew to MCI and met up with Laura for a very fun weekend of eating yummy food, meeting her cute little doggies, watching some football, and singing!

I flew back Sunday evening and almost missed my flight in Manhattan. Who knew that check in closes half an hour before take off!? I was there, taking my time, repacking my suitcase in the parking lot. I made it by two minutes (according to the snarky check-in jerk) but I was stressing about what could have happened for a few good hours after that! In the quick flight from Manhattan to Dallas I sat next to a guy who obviously had a LOT of money. He was going up to Chicago for a cattle conference (and was pissed that the flight from Manhattan to Chicago was full because now he had to fly from Manhattan down to Dallas then back up to Chicago. Essentially tripling his travel distance), said he volunteered for the K-State foundation, and was wearing a massive class ring and a gold watch with a crystal encrusted face. Muhla. But he was nice to chat with. Then waiting in line for my bag I was talking to a lady who had heard me say I graduated from K-State. Her son had tried out for the baseball team the day before and made it! I almost told her that all the girls in college think that baseball players are extremely attractive but I figured letting his mom in on the fact wasn't the best idea ever.
I then stopped at DICKEY'S!!! Omg the Texas memories :) It was our favorite bbq restaurant to go to in Austin. I was fast food but it was good fast food. I brought the cup home with me too :)

I finally got into DCA at 11:30, got home and into bed by 1:30am. Thank goodness I was working from home the next day. And this week was just an effort in survival. Not a ton of stuff to do but I still needed to get back in a rhythm, get back to normal, after the craziness of the last week.

So I'm back! And I'll be posting lots soon.
Subscribe to:
Posts (Atom)