We take a break from our irregularly scheduled basement renovation updates to bring you a reminiscent Mother's Day post!
For Mother's Day I wanted to make some pretty cookies and try out some new techniques and I thought the perfect people to send them to would be my grandmas! So I made two sets of cookies and shipped them out. They got there on Monday but I think they arrived intact and still tasty so all was good.
This was the big cookie I made for them. I'd seen this idea on another blog and I had tiny frosting tips so I wanted to try it. Essentially it's doing cross stitch with frosting. You take a tiny tip and draw a grid on the cookie. I then printed off a cross stitch pattern for a rose and using green and red frosting I made dots where all the crosses would be.
It's a pretty simple technique it just takes a long time to draw the grid! The lady whose blog I saw this idea on did portraits of people. I didn't think my grandmothers would appreciate a cookie portrait of Oprah so I stuck with a rise.
Here's the rose cookie all finished! (If the pixelation is giving people a headache, just step away from the computer screen and it will all be clear).
Here are both of them finished :)
The rest of the cookies took a whole different direction. I went with pastel colors and tried other techniques. For these cookies I did and outline and then filled the outline in with a lot of parallel lines, almost like needlepoint.
I don't know why but this one really reminded me of the rose in Beauty and the Beast which is like one of my favorite movies ever!
Quick trip down memory lane: when I was really little, like 4 or 5, you didn't go to the store to buy movies, you ordered them on the phone and they were delivered to you in the mail. Well it was close to Christmas and a package had come in so my dad put it on top of the fridge for safe keeping. Apparently at four years old I hadn't figured out how to scale furniture yet. Anyway mom and dad got to talking a few weeks later about why it was taking the movie so long to come in the mail and dad was like oh a package came in weeks ago but I thought it was for Christmas so I put it on the fridge. They then retrieved the package and covertly opened it and surprise it was the movie. I was standing in the kitchen the whole time this was happening and remember thinking that I knew that wasn't a Christmas present but whatever. So they both turned to me and were like surprise here's a movie! Yay! lol anyway I got Beauty and the Beast out of the deal and probably drove them both nuts watching it constantly but hey it was a good movie :)
I also tried some of my lace cookies again.
And I tried only flooding the middle of the cookie and doing lace around the outside edge. I apologize for jipping people on frosting. For some reason the blue frosting is looking really alienish to me in this picture. Hmmm I promise it's not radioactive.
And finally I tried out a swirly pattern thing that I'd seen on another cookie blog (I read so many cookie blogs it's ridiculous. Never gets old). It didn't turn out as spectacularly as I wanted so I'll prob skip this one next time.
All the cookies together. I split these into two sets and sent them out with one big rose cookie so the grandmas would have a little variety (and a lot of cookies).
These were the flowers Dad got Mom for Mother's Day. She got them a day early because he picked them up on Saturday and put them in the outside fridge to keep fresh but lo and behold Mom made dinner and went to the fridge to get some ingredient and there the flowers were nestled between the eggs and the broccoli. Surprise! Lol
Here you can see more of the bouquet but all I really cared about were the roses. They were orange and gorgeous.
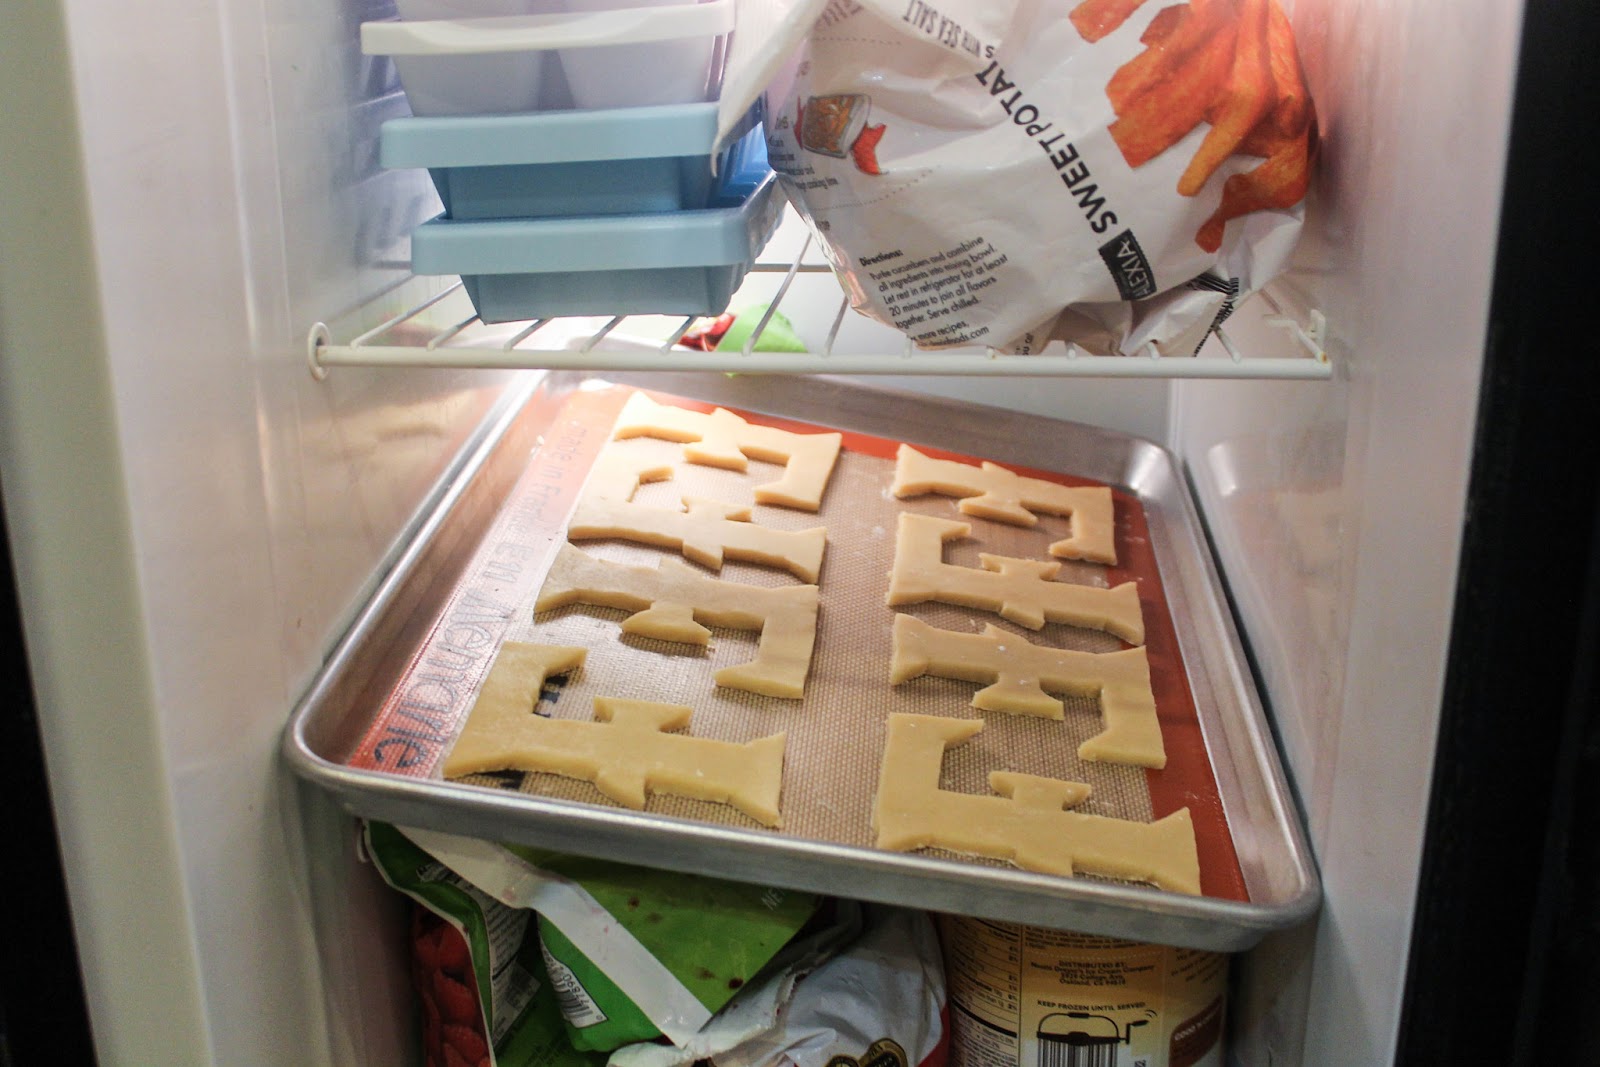
And finally, since I'd made cookies for my grandmothers for Mother's Day it's not like I could forget to make my Mom some cookies, so I made her a piano! And this is a completely accurate representation of a piano with the right number of keys btw. The size of the keys is not as accurate but at least it's close.
My mom has played piano off and on for the churches we've gone to since I was in middle school. She plays all the time at home as well, so I thought it was appropriate :)
I didn't have long, thin rectangle cookie cutters to use so I used a pizza cutter to cut out the rectangles.
I used sugar cookies for the white keys and gingerbread cookies for the black keys. I'm smarticle like that ;)
Of course I made her actually play the "piano" too :) Oh and bonus, there's the piano in the background! So Happy (belated) Mother's Day to all you moms out there!
Wednesday, June 12, 2013
Sunday, June 9, 2013
Marketable Amenities
I got a new faucet! I got a new toilet!!! I am so excited!
Look at how shiny and brushed nickley and pretty and sleek and NEW!
Look at how stately and stable and awesome! What a lovely toilet. It's so new it still has a sticker on it!
I'm not kidding, I'm very excited. If you had seen what was there originally you'd be excited too. There are a few of my relatives who know my pain. They've seen it. They've experienced it. And surprisingly they haven't been back to visit ahem ahem.
When people come to visit they stay in the basement because it's essentially it's own little suite. Bedrooms, bathroom, windows, tv, couch, wet bar, living room, air hockey table. It's a pretty nice set up, which is why I'm moving down there. But first, we had to make it livable.
Ok, deep breath.
Here it is. In all it's glory.
Gag.
Honestly what sort of things happened to this poor faucet? How do you make a brass faucet black? Was it corrosive toothpaste? A gremlin living in the drain that used it for teething purposes?
What we do know is that the basement is where the German nanny lived. Yes the people who lived here before us had German nannies. They also had marble busts of their children on the mantle in their pink living room. They were scary, scary people. Anyway, we don't know how this atrocity happened, but I didn't want to touch it. So we got a plumber to replace it.
I didn't get an up close and personal picture of the old toilet. I apologize. I just know you're so disappointed about not seeing a picture of the old toilet. Unfortunately a picture would not be able to show how it wobbled when you sat on it or how the water would drain out of it completely if you didn't use it often enough. Here it is with me trying to paint behind it. I tried to be a bit careful but hey it was going into the trash so I didn't try too hard to not get paint on it. Bye bye old toilet.
And why did I have a plumber come and replace the toilet and the faucet? Why didn't I do it myself and save hundreds of dollars? This is actually a question I had at the beginning. There are a million DIY tutorials about replacing faucets and toilets, I could have done it myself except . . . do you see all that shiny new silver pipe and white PVC pipe? That's ALL new. Essentially the plumber replaced everything from the faucet down to the wall. I was prepared to shut off the water, disconnect the pipes, replaces the faucet, and reconnect the pipes. I was NOT prepared to weld, tighten, screw, and replace piping. I don't have the tools and the experience.
Also, that white thing in the side of the picture? That's the sink. There was about 5 inches between the sink and the wall which meant no clear view of anything and no room to work. Have fun mr. plumber!
So, yes, I wimped out and let them call a plumber, but I know my limitations and I was not prepared for this project and felt just fine calling in the professionals. And hey, it's not my house either soooo yeah, I'll mess around with DIY renovation when I'm paying the mortgage ;) I did throw around the idea of staying home and watching the plumber work so I could figure out how to do it next time . . . but I figured that would make him pretty annoyed and the last thing anyone wants is an annoyed maintenance person! Lol
Oh, and side note, we used the same people that replaced our water heater and they seem very knowledgeable about not only replacing fixtures but they also know how to replace piping and valves and such. So I recommend them. Since no one reading this lives here though, it's a moot point lol.
Pretty, new, non-grody sink faucet!
Non-wobbly new porcelain thrown! P.S. my dad's jealous, maybe for Christmas I'll have them replace the master bathroom one . . .
Anyway, the bathroom is ALMOST completely finished! Update coming soon!
Wednesday, May 15, 2013
Crafting Schedule
I have decided, for numerous reasons, to move to the basement for the summer. I plan to start looking for places to live in the fall. I haven't decided whether or not to buy a condo or rent an apartment. It's hard to justify spending $2000 in rent per month but I'm not sure I've mentally wrapped my mind about owning something as substantial as a condo. We shall see. But for now I'm staying at home and moving to the basement. I wish the basement had a kitchen so I could live essentially on my own, but it doesn't so I'll suck it up for a few more months (how many times have I said that before).
The impetus for my move is Medium Well is coming home. And if you've ever experienced two adults and a teenager in the same bathroom getting ready at the same time you know why I'm moving to the basement. If you've never experienced that then count yourself lucky. It's a war. An all out, drop down, drag out war. I'd guard my makeup with the straightener while Medium Well and Small One duked it out with elbows. It was ridiculous. Whew, bad memories.
Anyway, this move has inspired my creative streak! Not that it's ever particularly dormant . . . I guess this just nullified my laziness. I no longer have an excuse to do nothing on the weekends just because I feel like it, I now have to get my butt in gear or else!
Here's a quick run down of the first few projects on my list.
First was the bathroom (for aforementioned reasons). I can tart using the bathroom in the basement before I have to move down completely.
The first thing to go in the bathroom was the hideous wallpaper. This is the wallpaper carnage. It wasn't pretty.
The cabinets in the bathroom and the cabinets in the wet bar desperately need to be stained. They will be, a dark, lovely java color. Oh and the laminate counter top on the wet bar. Hideous. I'm thinking of at least painting it and maybe putting up a small tile backsplash and making it resemble more of a kitchenette.
This is the last major change I will be making. This is a room without any doors. It's a small enclave that I'm using for craft storage right now. This is also where we stick people come to visit us :) It has a window so if more people stay than can fit in the bedroom we have them stay here on the pull out couch (I move craft supplies of course). If you sleep in a basement you have to have a window for escape in case of a fire (code issues).
I want to turn this space into a walk in closet! I'll hang shelves along the walls and move the furniture out and have a desk centered under the window.
Now for the not so big changes. I want to refinish this coffee table and make it a tufted ottoman.
I want to paint this hideous chair white and recover the cushions in a soft chenille fabric that's lying on the chair right now.
I would also like to take the time to inform anyone who was interested and concerned for my general state of mind, I DID NOT BUY THIS CHAIR! No one in my immediate family bought this chair. A woman in my dad's office was moving to Texas and getting rid of her furniture. I bought a lot of her stuff and this came with it. It's hideous but beggars can't be choosers. I'm hoping I can make it somewhat better (they still sell this same chair at IKEA btw. If you ever feel so inclined please, whatever you do, do not buy the fake black leather version. Fake black leather and plastic wood make me gag).
On that happy note, here are the fabrics I've chosen for the curtains in the rooms. This is the fabric that is going in the new walk-in closet. This fabric will stay in the room even after I've left so my mom approved it's colors and designs.
And this is the fabric for the curtains that will go in the room that will be my bedroom. I'll take these with me when I leave since the colors are neutral and the pattern sophisticated enough that they will probably match a lot of spaces in houses throughout my life.
Well, there you have it. A quick run down of all the crafts that will keep me busy for the next month or so. After I finish these projects there are a lot more to go (tufting a headboard, painting my new bedroom, recovering both couches, making shelves, etc) but that's another blog post for another time. Wish me luck!
Saturday, May 11, 2013
My Sweet Tooth
Look at these gorgeous little pastel parcels of loveliness! Look at them all nestled in their soft bed of colored Easter grass just waiting for me to stop by and marvel at their delicate perfection, ponder their lusciousness, and reminisce about their deliciousness.
And then stuff a handful in my mouth and swoon in bliss while breaking the scale at the same time. Don't ask me how it happens, call it my intuition, but you can just hear the scale cracking and groaning from the bathroom when eating these little buggers. Not that this stops me. I've just taken to avoiding the scale. Our breakup wasn't him, it was me.
This is what my parents do to me!!! Situated right next to the fruit bowl is the ever present Cadbury egg and white chocolate M&M bowl, and it never ends! Seriously, when this thing gets low it just get refilled. Magically. By the fairies who hate bathroom scales and my jeans.
You see my parents have this thing called "self control" when it comes to these delightful delicacies. I don't. None. Not at all. It must be a gene I'm missing. Or maybe I have the "it's delicious, I'm going to eat more of it" gene. So, for them, having this bowl of tempting lusciousness out all day, every day is no problem. For me it's a nightmare. A wonderful nightmare filled with longing, satisfaction, and guilt. Lots of guilt. I think bowls of cadbury eggs are why confession was invented.
When faced with situations like this, I normally choose avoidance. I would physically remove myself from the temptation by not purchasing any sweets. Lent was also a time when I was spectacular in self restraint (New year's resolution, not so successful. Lent, very successful. Again with the guilt thing). Sadly I can't say to my family "I have to fit into a bikini and look presentable in less than two months so I'm flushing your entire devilish stash of cadbury eggs and white chocolate m&ms down the toilet." I'm pretty sure I would be disowned. And I can't even eat them faster to make them all go away.
This is what our pantry looks like right now. You see, we absolutely love, cherish, and adore these little chocolate lovelys and they're only available for a limited time every year. So we stock up. Which means we should be set to last the summer and only suffer a few months of deprivation before Christmas rolls around and we can get our fix again. Why do we have so many bags of these candies? Because I made them buy them all. They were pretty embarrassed going to the store and purchasing 8 bags at a time, let me tell you. And why was I making them buy all this candy when I've just spent the first part of the blog post complaining about my squishy, non-bikini-ready stomach? Because we didn't buy as many bags last year and we ate them up faster and I had to spend a good 7 months listening to "I miss white chocolate m&ms," "I wish we still had white chocolate m&ms," "weren't those white chocolate m&ms good?" So to save my sanity I made them buy enough to last the summer, subsequently sabotaging my goal of meeting a future husband or boyfriend and wowing him with my toned physique.
But it's worth it, I guess, because these little things are delectable. Truly they are really, really good. I confess to having a soft spot for white chocolate. I have loved it all my life. As a young kid I only liked milk chocolate and white chocolate. Small One and Medium Well got the chocolate Easter candy and I got the white chocolate Easter candy. This was just a fact of life.
(Oh, P.S., for my birthday my mom and Medium Well found white chocolate cake batter bark from Godiva. Um heaven!)
Where was I? Oh yes. I was first introduced to white chocolate m&ms back when the second Pirates of the Caribbean movie came out. They came out with a special edition version for the movie and omg it was amazing! My mom and I fell in love. Sadly this special edition never gained enough popularity to become a mainstay on the shelves and all we were left with was a vague memory of blissful scrumptiousness (and anger at the coconut m&ms they decided to introduce instead. Honeslty have you ever heard anyone say they actually like the coconut m&ms? Ever?). That was until last year when, by some miracle, we found white chocolate m&ms special for Easter!!! Words cannot describe how excited we were (because our mouths were full, duh!). But we misjudged our voracious appetites, hence the wailing and the moaning and why I didn't make the same mistake this year.
I did have a minor scare this year when the Cadbury eggs were out at our grocery store for weeks and I looked and looked for white chocolate m&ms and couldn't find them. I had almost resigned myself to the fact that they weren't popular enough the year before and wouldn't be sold this year when we randomly saw them at Target. Apparently white chocolate m&ms are a special Target only product. Who knew. Anyway, crisis and melt down averted.
White chocolate m&ms joined our mainstays of Cadbury eggs for Easter. I can't remember when we first had cadbury eggs. I mean we knew about the cadbury cream eggs for years. Those were synonymous with Easter candy, but I think mom and dad got the mini eggs randomly one year and they became a given in our Easter baskets. I have no idea what makes them so addictive but they are so good it's ridiculous! Thankfully they now sell them at Christmas time too (although they're just balls, not eggs. I've never heard of Christmas eggs.)
We also found the dark chocolate version a few years ago and dad has been loving them. I think they taste fine, but I prefer the milk chocolate and so does everyone else so dad gets these all to himself.
So that is the story of our stash. My wasitline will get bigger as our stash gets slowly smaller. I might hide a few bags and bring them out in August when morale gets low. But I'll only have to do this with the Cadbury eggs because . . . they now sell the white chocolate m&ms at Target and not just for Easter!!! I was almost disappointed, all those embarrassing shopping trips looking like a hoarder of candy for nothing! We can now indulge our passion for white chocolate whenever we want! Forget the ten bags we still have in the cabinet. Sigh. Oh well, at least now you all can go and try them and experience them and then maybe you won't think I'm as crazy for writing a blog post about how much I love white chocolate and the angst I've gone through for years over these things :)
Monday, May 6, 2013
Leaves and How They Fall
This was the backyard last year in the Fall. The colors were really pretty but at this point most of the leaves had already fallen. For some reason the tree closest to the porch didn't get the memo that it was time for the leaves to turn colors . . . I bet he was texting . . .
See? All the leaves are on the ground. Mom gets so sad when this happens. One of her favorite pass times is to sit on the deck and just look at the trees so when the leaves all fall . . . well let's just say if there was a seasonal leaf-fallage disorder my Mom would have it!
Ah the bird feeder. We have the special weight sensing bird feeders so that no squirrels can eat the bird feed. Birds are light enough that when they sit on the feeder they can eat, but when the squirrels try to sit on them, they're too heavy and it closes the holes where the bird feed is.
Btw, those birds eat like you wouldn't believe! Dad will fill it up on Sunday and it will be gone by Tuesday morning. High maintenance little buggars.
Here's the magnolia out front. I actually took those photos right before Hurricane Sandy was going to hit because I knew once all the wind and the rain was finished we'd have no more leaves left at all.
Here's a little birdie taking a bath during Sandy. It was just the cutest thing bouncing around on our front steps!
And this is our backyard in the Winter.
HA! Just kidding! This is our backyard in the SPRING! Yep folks this picture was taken in April. Go figure. Since we didn't get any measurable snow during the winter, though, I was ok with getting snow in the spring.
Ahhh back to leaves again. Once the snow and the cold went away the leaves just popped out. It's like they were waiting until the cold weather completely left and once they knew it was safe they made up for lost time. I barely noticed buds before all the leaves were suddenly there. Now we just have to wait for summer and everything will be covered and shaded by leaves!
Saturday, May 4, 2013
If You Give a Girl a Baking Sheet
So I cookie. That's what it's called, "cookie-ing." Trust me, I've read enough cookie blogs to know that because I "cookie" I am a "cookier"and what I do is called "cookie-ing." Apparently people who "cookie" are smart enough that they can make up their own words . . . lol, oh well, at least it makes sense.
Btw, I think I'm addicted to reading cookie blogs. Pinterest and cookie blogs.
I like to cookie a lot and since my family is pretty much sick of sugar cookies by now (they haven't said anything to me, but I can infer) I keep having to invent new reasons to justify making cookies and decorating them. "Hey mom and dad, you now have two dozen cookies just because I wanted to try out this new piping technique. Surprise!" doesn't sit too well. But it's getting to be a bit of an obsession. If I go more than two weeks without making cookies it feels weird. Thankfully there are enough events and holidays (first volleyball game of the season anyone?) that I can make cookies pretty often.
So since I make so many cookies and post the designs ad nauseum I figured I should show the process of how I make the cookies and not just the finished product!
First, make any cookie dough you want. I make the cookie dough from the blog Bake at 350. I had a blind taste test between our traditional cookie dough, the cookie dough I used during college, and this cookie dough this past Christmas with the family and the Bake at 350 cookie dough won! It also stands up pretty well to baking and shipping. This is what works for me, but you can use your favorite recipe for cookie dough.
Take the dough and plop it down on a lightly floured surface. The dough that I use doesn't use softened butter, instead it takes cold butter, cut into cubes, and mixes it with the sugar. This means that you don't have to refrigerate your cookie dough before you roll it out. It saves A LOT of time. It's awesome.
I also like to take a piece of freezer paper and tape it to the counter and roll my cookie dough out on that. You don't have to do this if you don't want to, I just like being able to untape the paper and put the whole mess into the trash can instead of having to scrub the counter for ages after rolling out the dough.
This is the rolling pin I use. I got it for Christmas and it's really nice because the plastic disk on the side keeps the entire dough the same thickness. I use the 1/4" thickness. I've heard that people do it thicker at 3/8" but that is a thick cookie! Who knows, I might switch to a 3/8" thick cookie in the future but for now I make a 1/4" thick cookie.
Having the cookies all one thickness and never having to guess at how thick to roll the dough makes sure that all the cookies bake at the same rate.
When the dough is all rolled out and the cookie shapes are cut out, arrange the cookies on a silpat. This lovely invention makes sure that the bottoms of the cookies never burn and that the cookies never stick to the pan. And it's pretty inexpensive, just $25. If you make a lot of sugar cookies I really suggest it. Chocolate chip cookies don't work as well on it, they spread out. So if you like flat chocolate ship cookies this will also work for you (but we like our chocolate chip cookies mounded. Personal preference and all that).
Isn't it funny how something as simple as cookies can have so many different "right" ways of being made?
Ok, here are the cookies arranged on the cookie sheet. You don't need them to be spaced very far apart because . . . .
You freeze them before you bake them! Seriously. Put the cookies in the freezer for at least five minutes before you cook them. This will ensure that the cookies keep their shape. Ever had those Christmases where the snowman migrated into the santa and morphed into a reindeer? Yeah, that's because the cookies weren't frozen beforehand. Trust me on this, it will change your life and save you a lot of tears!
Bake them for 10-12 minutes. I know that at 12 minutes the cookies will be perfect, but that's for my oven and all ovens are different, so finding the exact time will take some trial and error.
Five minutes is the minimum, but I normally freeze them for 10-12 minutes. I work on two cookie sheets so while one sheet is in the oven, I have the other cookie sheet in the freezer (and it takes 12 minutes to bake a pan of cookies, hence the 12 minute freezing time lol).
See? Pretty cookies, no spreadage (making up words again). You can take them off the pan to cook on a cookie rack, but leave them on the pan to cook down a bit and firm up first. There is nothing worse than lifting a freshly baked cookie off the cookie sheet and having it break in half because it hadn't hardened enough. Leaving them on the sheet won't harm them at all.
Ah, the most important (and yummiest) part of the cookie baking process . . . tasting! Now before you go poo-pooing taste testing as just an excuse to eat a cookie (which is partly is), it's also important if you're giving cookies to other people to eat, like your office or your friends. Case in point: I use salted butter to make the cookie dough. It's pretty much the only thing I ever use salted butter for, so I ran out one day and didn't want to go to the store just to get salted butter when I had butter in the fridge and salt in the cabinet. So made the dough as normal and I just added a teaspoon of salt to the butter in the beginning. BIG mistake! I later learned that each stick of butter only has 1/8th of a teaspoon of salt in it, so by adding 1 teaspoon of salt I had added four times the salt needed to the dough! Those cookies were for my mom's birthday so it's a good thing I tasted them before I had decorated them and sent them out the door.
Moral of the story (or blog post), taste your finished cookies, freeze you cookies before baking, and use cold butter to make the dough. Voila! You will have perfect cookies every time :)
Frosting how-to coming soon . . .
Subscribe to:
Posts (Atom)


